If you are right here suggests, you have actually currently mounted WordPress on your organizing web server. If you have actually not yet mounted WordPress, listed below tutorials will certainly aid you to do so.
- Install WordPress utilizing Cpanel?
- Install WordPress on Your Hosting Web Server Utilizing FTP Customer FileZilla?
If you are an enthusiastic internet programmer or wish to examine anything prior to doing it on your online blog site after that the very same can be checked by setting up WordPress on your Neighborhood Equipment Utilizing WAMP or XAMPP.
Currently you have your brand name blog site live as well as you are delighted to release the very first post on your brand-new blog site. Correct?
Wait! You still have some actions to go!
After fresh WordPress installment, you will certainly need to do some basic however necessary standard setups in your WordPress control panel to have a smooth beginning.
Simple however Necessary standard setup after fresh WordPress Setup
Remove Dummy Blog Post, Remark as well as Web Page
By default, WordPress provides dummy article, remark, as well as web page. This article, remark, as well as web page are simply for instance as well as need to be eliminated after fresh WordPress installment. This leads you to proceed with your very first grand write-up for your viewers.
Tips to erase Dummy Blog post
- Login to control panel as well as click Blog Post>>> > All Blog Post
- Click garbage switch to erase the dummy write-up as received listed below photo.

Tips to erase Default Remark
- On control panel, Most likely to Remark
- Click garbage switch to erase the dummy remark as received listed below photo.

Tips to erase Default Web page
- On control panel, most likely to Web Page>>> > All Web Page
- Click garbage switch to erase the dummy web page as received listed below photo.

Edit Default Group for post
You wish to specify a various classification to ensure that you can separate your article category-wise. On fresh WordPress installment, by default, you will certainly obtain a Uncategorized classification.
Tips to Modify Default Group
- On control panel, most likely to Blog Post >> > > Classifications
- Click Edit/Quick Edit to modify the default classification as received listed below photo.

Remove Unwanted Default Style
It is suggested to set up the style which you desire for your blog site as well as erase the undesirable style. Removing the undesirable style will certainly provide you even more internet area as well as eventually your blog site will certainly fill much faster.

To turn on any one of the mounted motifs, simply float on a style to obtain Trigger switch. Click Activate to use picked style.

To erase any type of amongst mounted motifs, click any type of style. Try to find erase web link as well as click it to erase the style from your blog site web server.

Install Plugins
You can set up some helpful plugin for your blog site. Below I would certainly advise some listed below plugins while beginning after fresh WordPress installment as well as offering a begin to your blog site:
- Akismet Anti-Spam: To stop spam discuss your blog site
- Jetpack: It provides numerous helpful attributes for WordPress blog site like website statistics, Widget exposure, Google Authorship, Memberships and so on
- W3 Overall Cache: It enhances search engine optimization as well as individual experience of your blog site by raising blog site efficiency.
- BackWPup: Assist to set up automated back-up of your total blog site.
Tips to Mount Plugin
- On Control panel, click Plugins.
- Below you can examine your mounted plugin.
- You can additionally turn on, shut down or erase the mounted plugins.

- To include plugin click Plugins>>> > Include New After that look for the called for plugin as well as click set up switch for proper plugins.

Edit Customer Account
Utilizing this alternative, you can modify your individual information.
You can specify your name to be shown openly.
You can transform your password, e-mail, site link for your blog site.
You can include information to your writer box as well as account photo.
Tips to Modify Customer Account
- Most Likely To Control panel, click Customers>>> > Your Account
- Modify your information.

Configuration General Setup
- This is just one of the crucial setups you require to configuration.
- The title of your blog site as well as the punch line which specifies your blog site, are established right here.
- You need to specify link for your WordPress blog site
- Below you can specify that can sign up on your blog site.
- Enter your e-mail id, on which you will certainly obtain alerts when a person discuss your post or you obtain comments from call us web page.
- Specify language as well as time area for your blog site.


Configuration Creating Establishing
Making use of composing establishing you can specify default classification alternative for you blog write-up.
The crucial point is Update Solution alternative offered on this web page. This attribute will certainly allow other individuals recognize when you upgrade your post By default, in Update Solution textbox one website link will certainly be reference.
I would certainly advise including listed below link also to obtain vast network upgrade solutions:
http://rpc.pingomatic.com
http://rpc.twingly.com
http://api.feedster.com/ping
http://api.moreover.com/RPC2
http://api.moreover.com/ping
http://www.blogdigger.com/RPC2
http://www.blogshares.com/rpc.php
http://www.blogsnow.com/ping
http://www.blogstreet.com/xrbin/xmlrpc.cgi
http://bulkfeeds.net/rpc
http://www.newsisfree.com/xmlrpctest.php
http://ping.blo.gs/
http://ping.feedburner.com
http://ping.syndic8.com/xmlrpc.php
http://ping.weblogalot.com/rpc.php
http://rpc.blogrolling.com/pinger/
http://rpc.technorati.com/rpc/ping
http://rpc.weblogs.com/RPC2
http://www.feedsubmitter.com
http://blo.gs/ping.php
http://www.pingerati.net
http://www.pingmyblog.com
http://geourl.org/ping
http://ipings.com
http://www.weblogalot.com/ping

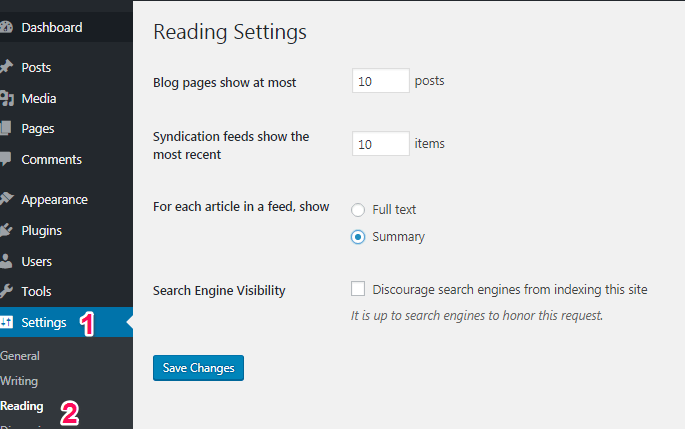
Configuration Checking Out Setup
Checking out establishing aid to configuration, just how your article ought to show up on the homepage. Simply make certain listed below setup is done.
Configuration Conversation Setup
This configuration will certainly aid you to handle your viewers communication with your article. Furthermore, whether they are permitted to publish a remark? That can publish a remark? What information do they require to supply as a viewers? Etc.

Configuration Media Setup
Below you can specify the dimension of a photo, you will certainly be utilizing in your post. Various kind of photo can have various dimension. Establish it appropriately!

Configuration Permalinks Setup
Below comes your post URL web link style. Numerous newbies make blunder by disregarding this setup.
Make certain to establish your permalinks establishing as 'Blog Post Call' This will certainly produce your blog site write-up link as your blog site name complied with by your article name. As an example, check over address bar of your internet browser.

Final Thought
These are some basic however necessary standard setup on your WordPress control panel which requires to be done after fresh WordPress installment. I wish to state another factor, this standard setup is the primary step for your blog site search engine optimization. This single configuration will certainly aid you in future.
We will certainly share much more plugins, motifs for WordPress which will certainly aid you to boost your blog site day after day. Do share your comments
Brief Link: